Script to configure Exchange Server 2010 for SSLOffloading

When using a hardware load balancer you sometimes come across the need of configuring Exchange Server to support SSLOffloading. In my case I use a Citrix Netscaler to publish Exchange Server in a scenario where I have enabled SSLOffloading in the Citrix Netscaler. So, in order for this to work configuration changes needs to be done in Exchange Server 2010.

The script below configures both Exchange 2010 RTM and SP1, it also configures basic authentication in IIS for ECP, EWS and OWA.

#
# This script will configure the Exchange 2010 RTM and SP1 Client Access Servers for SSLOffload
# It applies when using Hardware loadBalancer with SSLOffloading enabled
#
# Created by Martin Sundström 2011-09-26
#
#---------------------------------------------------------------------------------------------------------------------------------------------------------
Write-Host -f DarkGray "This script will configure the Exchange 2010 RTM and SP1 Client Access Servers for SSLOffload"

# Set SSLOffload registry key for OWA 
Write-Host -f DarkGray -f DarkGray "Setting SSLOffload registry key for OWA..."

New-ItemProperty -Path 'HKLM:\SYSTEM\CurrentControlSet\Services\MSExchange OWA' -Name SSLOffloaded -Value 1 -PropertyType DWORD 

Write-Host -f DarkGray -f DarkGray "Done!"
Write-Host -f DarkGray -f DarkGray ""


# Assign Static Ports"
Write-Host -f DarkGray "Assigning static ports..."

# Assign Static Port for MSExchangeAB 
New-Item -Path HKLM:\SYSTEM\CurrentControlSet\services\MSExchangeAB -Name Parameters -Type Directory
New-ItemProperty -Path HKLM:\SYSTEM\CurrentControlSet\services\MSExchangeAB\Parameters -Name RpcTcpPort -Value 60000 -PropertyType String 

# Assign Static Port for MSExchangeRPC 
New-Item -Path HKLM:\SYSTEM\CurrentControlSet\services\MSExchangeRPC -Name ParametersSystem -Type Directory
New-ItemProperty -Path HKLM:\SYSTEM\CurrentControlSet\services\MSExchangeRPC\ParametersSystem -Name "TCP/IP Port" -PropertyType DWORD -Value 59532

Write-Host -f DarkGray "Done!"
Write-Host -f DarkGray ""


# Disable RequireSSL on websites
Write-Host -f DarkGray "Disabling RequireSSL on websites..."

."$($env:windir)\system32\inetsrv\appcmd" set config "Default Web Site" -commitPath:APPHOST -section:access -sslFlags:None -section:basicAuthentication -enabled:true
."$($env:windir)\system32\inetsrv\appcmd" set config "Default Web Site/Autodiscover" -commitPath:APPHOST -section:access -sslFlags:None 
."$($env:windir)\system32\inetsrv\appcmd" set config "Default Web Site/ecp" -commitPath:APPHOST -section:access -sslFlags:None -section:basicAuthentication -enabled:true
."$($env:windir)\system32\inetsrv\appcmd" set config "Default Web Site/EWS" -commitPath:APPHOST -section:access -sslFlags:None -section:basicAuthentication -enabled:true
."$($env:windir)\system32\inetsrv\appcmd" set config "Default Web Site/Microsoft-Server-ActiveSync" -commitPath:APPHOST -section:access -sslFlags:None 
."$($env:windir)\system32\inetsrv\appcmd" set config "Default Web Site/owa" -commitPath:APPHOST -section:access -sslFlags:None -section:basicAuthentication -enabled:true
."$($env:windir)\system32\inetsrv\appcmd" set config "Default Web Site/rpc" -commitPath:APPHOST -section:access -sslFlags:None 

Write-Host -f DarkGray "Done!"
Write-Host -f DarkGray ""


# Configure Outlook Anywhere
Write-Host -f DarkGray "Configure Outlook Anywhere"

$enabled = Get-OutlookAnywhere -Identity "$($env:COMPUTERNAME)\RPC*" 
	
If ($enabled) 
{
	Set-OutlookAnywhere -Identity "$($env:COMPUTERNAME)\RPC*" -SSLOffloading $true
} 
Else 
{
	Write-Host -f DarkGray "Configure Outlook Anywhere and remember to check the box to enable SSL Offloading"
} 

Write-Host -f DarkGray "Done!"
Write-Host -f DarkGray ""
	

# This part of the script only applies to Exchange Server 2010 RTM, a version check will be made:
$VersionCheck = ((get-exchangeserver -identity ($env:COMPUTERNAME)).AdminDisplayVersion | Out-String ).StartsWith("Version 14.1")

If ($VersionCheck = $False)
{
	# Configure web.config files
	Write-Host -f DarkGray "Configuring web.config files for RTM..."

	$path = (Get-AutodiscoverVirtualDirectory -Server ($env:COMPUTERNAME)).Path
	(Get-Content $path\web.config) | Foreach-Object {$_ -replace "httpsTransport", "httpTransport"}  | Set-Content $path\web.config
	
	$path = (Get-WebServicesVirtualDirectory -Server ($env:COMPUTERNAME)).Path 
	(Get-Content $path\web.config) | Foreach-Object {$_ -replace "httpsTransport", "httpTransport"} | Set-Content $path\web.config  

	Write-Host -f DarkGray "Done!"
	Write-Host -f DarkGray ""
}


# Run IISReset
Write-Host -f DarkGray "Running `"iisreset`" to complete the process..."

iisreset

Write-Host -f DarkGray ""

Feel free to use and edit as you need and don’t hesitate to drop a comment if you find any errors or have any questions!

Exchange Server 2010 SP1 released!

Yesterday Microsoft released Service Pack 1 for Exchange Server 2010. I will post more on this ASAP, while you are waiting you can read more on SP1 here:

MS Exchange Team Blog: http://msexchangeteam.com/archive/2010/08/25/455861.aspx

Download: http://www.microsoft.com/downloads/details.aspx?FamilyID=50b32685-4356-49cc-8b37-d9c9d4ea3f5b&displaylang=en

What’s new: http://technet.microsoft.com/en-us/library/ff459257.aspx

Release notes: http://technet.microsoft.com/en-us/library/ff728620.aspx

Integrate OCS 2007 R2 with Exchange Server 2010 SP1 OWA

I have seen a number of posts in different forums with questions on how to integrate Office Communications Server2007 R2 with Outlook Web App in Exchange Server 2010 Service Pack 1. There are some changes made in SP1 that will cause your current integration to break. But this can be easily fixed with a couple of configuration changes.
 

Changes? Why Changes??

Well, changes in this case is good. What Microsoft has done is to move the Instant Messaging settings for the OWA virtual directory from web.config to Active Directory where it should be. It’s better to have all parameters for OWA virtual directory gathered in one place, right?
Below, I will walk you through the complete configuration process. If you only want to read about the configuration related to SP1, scroll down a bit to configuration!
 

Pre-requirements

OCS 2007 R2 Web Service Provider found here:
http://www.microsoft.com/downloads/details.aspx?familyid=CA107AB1-63C8-4C6A-816D-17961393D2B8&displaylang=en

Hotfix for the OCS 2007 R2 Web Service Provider:
http://www.microsoft.com/downloads/en/details.aspx?FamilyID=45C94403-39FA-44D3-BE23-07F25A2D25C7

Update Unified Communications Managed API 2.0 Redist (64 Bit) Hotfix KB 2282949:
http://www.microsoft.com/downloads/en/details.aspx?FamilyID=1F565A42-71D2-4FBD-8AE0-4B179E8F02AB

When running Exchange2010 Sp1 on a Windows 2008 R2, include the following UCMAREDIST Update, available here:
http://www.microsoft.com/downloads/en/details.aspx?FamilyID=b3b02475-150c-41fa-844a-c10a517040f4

Installation

The installation of the Web Service Provider is quite straight forward:
  1. Download and execute CWAOWASSPMain.msi to you Exchange Server 2010 CAS.
  2. In Windows Explorer, navigate to the directory where the files from CWAOWASSPMain.msi were placed. The default location is C:\Web Services Provider Installer Package\.
  3. Execute and install vcredist_x64.exe.
  4. Execute and install UcmaRedist.msi.
  5. Go to Start > All Programs > Accessories, right-click Command Prompt, and then click Run as Administrator.
  6. Go to the directory where the files from CWAOWASSPMain.msi were placed and run CWAOWASSP.msi.
  7. Install the other updates listed under pre-requirements above.
Done, you should now have all the required components installed on you Exchange Server 2010 CAS.
 

Configuration

 
Certificate
First we will configure the certificate. We start of by getting the thumbprint of the certificate by using the following command:
get-ExchangeCertificate | fl
 
Your thumbprint should look something like this:
4DC1EE3506E06E971FF82AC8DD60015EAC11B21E
 
To apply this to our configuration use the following command:
Set-OwaVirtualDirectory -Identity <"WebSiteIdentity"> –InstantMessagingCertificateThumbprint <CertificateThumbprint>
 
Example:
Set-OwaVirtualDirectory -Identity "SUNDIS-EX01\owa (Default Web Site)" -InstantMessagingCertificateThumbprint 4DC1EE3506E06E971FF82AC8DD60015EAC11B21E
ocsintegration1
 
Server Name
Next we set the server name for the OCS server, this should be the FQDN of the OCS server. Use the following command:
Set-OwaVirtualDirectory -Identity <"WebSiteIdentity"> –InstantMessagingServerName <ServerFQDN>
 
Example:
Set-OwaVirtualDirectory -Identity "SUNDIS-EX01\owa (Default Web Site)" -InstantMessagingServerName sundis-ocs01.sundis.local
ocsintegration2
 
Set type and Enable
Next we set the type of Instant Messaging Server to OCS by using this command:
Set-OwaVirtualDirectory -Identity "SUNDIS-EX01\owa (Default Web Site)" -InstantMessagingType OCS
ocsintegration3
 
And last but not least we enable Instant Messaging Server by using the following command:
Set-OwaVirtualDirectory -Identity "SUNDIS-EX01\owa (Default Web Site)" -InstantMessagingEnabled $true
ocsintegration4
 
Finish the configuration by doing a get to se the changes we made with the following command:

Get-OwaVirtualDirectory | fl InstantMessagingCertificatethumbprint, InstantMessagingServerName, InstantMessagingType, InstantMessagingEnabled
ocsintegration9

Well I almost forgot, the last thing you should do after all these configuration changes is to restart IIS by entering the following command:
iisreset /noforce
 
Now you should be all set!
 
OCS Settings
You do however need to make one last finishing touch on the Office Communications Server. That is to add the FQDN of the certificate that you specified in the Set-OwaVirtualDirectory command above as a trusted host in you OCS server. To do this Navigate to the pool or server in OCS, right click on your pool or server and select Properties and then Forest End Properties.ocsintegration5
 
Open the  Host Authorization tab and then click Add.ocsintegration6
 
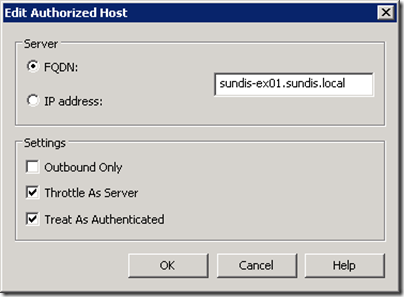
Enter the FQDN found on the certificate you added in the previous step and make sure that you check Throttle AS Server and Treat As Authenticated, when finished click Ok. The FQDN will most certainly include a external domain in your case. In my case it’s an internal domain for testing purposes.ocsintegration7
 
Make sure that all settings are correct, when finished click Ok.ocsintegration8
 
Give OSC a moment to apply the settings and then head of to OWA and enjoy!
 
Thanks for reading and don’t hesitate to comment if you have any further questions or thoughts about the post!

Exchange Server 2010 SP1 Beta – Installing and Features Part 2

This is the second post in my series about Exchange Server 2010 Service Pack 1 beta. It covers more of the features i think is worth mentioning.

Features Continued…

First, I will again give instructions on how to manage My Organization, this is where we can find both old and new features for administration in ECP.

ecp

Configure Transport Rules in ECP

To Configure Transport Rules in ECP, navigate to Mail Control and Rules. In my case the list of rules is empty since I haven’t created any rules yet. But let’s change that and start with creating a rule. I will create a disclaimer, a common rule to cover something used by most companies today. Click New to start the creation process.

transport1

In the New Rule window you can configure conditions and actions for the rule. If you click on More Options… you can also add exceptions. Choose The recipient is in the scope of and then select Outside the organization in the Select Scope window.

transport2

As the action choose to Append a disclaimer to the message…

transport3

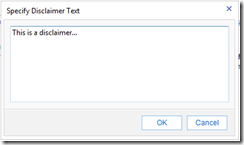
Click Enter text… to add the disclaimer message to the rule, when finished click Ok.

transport4

Then click Select one… to choose an action to take if the disclaimer can’t be applied. When finished click Ok.

transport5

This gives us the following rule, look through the settings to make sure that everything is ok and then click Save.

transport6

To make sure that everything is working ok we can check the rule in Exchange Management Console. As you can see, the rule we created in ECP is listed in EMC as well.

transport7

Configure Journal Rules in ECP

Just as Transport Rules we can now manage Journal Rules in ECP too, this is also placed under Mail Control. Before we create a new rule we must configure the address that NDRs for undeliverable journal reports will be sent to, Click Select address.

journal1

Enter the address you want to use or click Browse to browse for a user.

journal2

Choose the user you want to add and then click Ok.

journal3

When you are finished adding the address that reports will be sent to click Save.

journal4

Now that we have the report address configured we can move on to create a new rule, click New to start the creation.

journal5

First we have to configure the user which we will journal messages. This can be a specific user of we can journal all messages. To specify a user, Select A specific user and click Select people….

journal6

In the address book windows find and mark the preferred user, click Select and then click Ok.

journal7

Select the scope of messages, in my example the scope is All Messages. Also, add the address to forward journal reports to and enter a suitable name for the rule. When finished with the configuration click Save.

journal8

All done, but let’s check if the rule shows in Exchange Management Console as well.

journal9

”Reset Virtual Directory” tool in EMC

Some of you might think that this new feature isn’t that much of a deal, but you can’t imagine how many times a virtual directory reset can be the magic solution to problems related to any of the virtual directories. By adding this as a graphic wizard the MS Exchange Team has made it easy to use and you don’t have to use PowerShell.

To start the wizard navigate to Server Configuration, Client Access, select the server you would like to modify and either right click the server and click Reset Virtual Directory or click Reset Virtual Directory in the action pane.

reset1

On the Introduction step, click Browse to select the virtual directory to reset.

reset2

In my example I will reset Microsoft-Server-ActiveSync in Default Web Site, click on the directory you need to reset and then click Ok.

reset3

Click Next to move on to the next step.

reset4

To choose where to save the current directory settings click Browser. The default path will do for me, when finished click Next.

reset5

After reviewing the summary and making sure that all information is correct, click Reset.
Note that this does remove all custom settings for the specified directory and resets it back to default.

reset6

After the reset is complete click Finished.

reset7

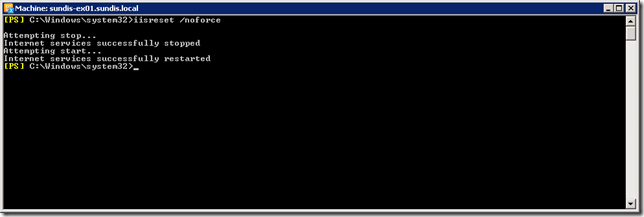
But we aren’t finished yet, for the changes to take effect we need to reset the IIS. Open your favorite console and run the following command:

iisreset /noforce

reset8

Thanks for reading!

That’s it for now folks, I might be adding another post with more features tomorrow depending on the work load. Thanks again for reading and do not hesitate to drop a comment or contact me if you have any questions of thoughts! Part one in this series can be found here: https://msundis.wordpress.com/2010/06/08/exchange-server-2010-sp1-beta-installing-and-features-part-1/

Exchange Server 2010 SP1 Beta – Installing and Features Part 1

Yesterday I downloaded the Exchange Server 2010 Service Pack 1 beta and I though that I would give you some more information then just the download link. This is part one and it will be followed by part two as soon as possible. I have choose to split the post in to at least two parts to keep them a bit more manageable…

 
Installing

Pre-requirements
There is a couple of pre-requirements that we need to look at first:

Don’t bother following the download links for the update and hotfix from the Readiness Check step in the setup since those pages can’t be found.

Install5 


Setup
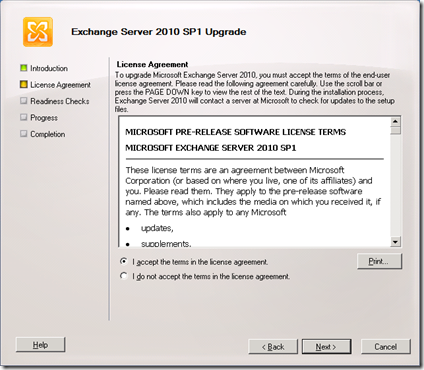
When you’re all set with the pre-requirements it’s time to start the setup. The process is quite straight forward, you have a couple of choices to make starting with language upgrade.

I choose only to upgrade the languages from the DVD as this matches the choice I made during the original installation. If you installed all languages you should choose to upgrade all languages in this setup as well.

Install2 

The next couple of steps isn’t much to talk about, just click through those…

Install3

Install4 

If you have installed the updates i mentioned in the pre-requirements section before your readiness check should look like this, all is well and we are ready to start the upgrade.

Install6

The upgrade process does take a while, this is a lab server so it’s not the fastest horse in the stable, but I have seen this mentioned by others too. So don’t expect to have the it done on your coffee break :)

 Install7

When all is done you should be up and running Exchange 2010 Service Pack 1!

Setup related issues
I tried accessing OWA directly after upgrading to SP1, and received Error Code: 408. The operation timed out. Apparently the World Wide Web Publishing Service (W3SVC) was never started after the setup was finished. After a manual start OWA worked just fine.

The second issue I found was that after installing the upgrade OWA had lost the default domain setting for logon. First I noticed this warning in EMC:

issue1

This is the warning message :

issue2

To solve the issue I opened up properties for OWA and changed the Logon Format to Domain/User name and clicked Apply. Then I changed it back to User name only, applied the settings and the message disappeared. Also worth mentioning is that OWA was functioning as normal both before and after this action was taken. This could be a error in EMC and not a actual configuration error in Exchange Server or IIS.

issue3

Features

This is not a complete list of features, Microsoft has yet to release a complete description of Service Pack 1. But since this is a beta my guess is that we will see a complete list in the release notes for Service Pack 1 RTM. I will present some of the new features that I appreciate below, if you have questions on any other feature and would like me to investigate it just let me know and I will post it here.

RBAC role management in ECP


Since I am a bit of a RBAC freak I found this feature very handy. There are three options to choose from:

  • Administrator Roles – Manage Role Groups and administrative rights
  • User Roles – Manage Role Assignment Policies and users rights to handle their own mailboxes and settings
  • Auditing – Generating reports for easier overview of changes made to mailboxes and configuration


Manage My Organization in ECP
Before we can do any changes to the organization we need to navigate to the ECP and choose to manage My Organization.

ecp


Administrator Roles
In this example I will add one of my users, Test, to the Recipient Management Role Group. Start with selecting the correct group and click Details.

rbac1

Then choose which users to add to the Role Group, click Add to display a window with the user list.

rbac2

Select the user you would like to add to the Role Group and click Add. You can add multiple users at once or one at a time. When finished, click Ok.

rbac3

Back in the Recipient Management Role Group Window, do a quick check that all settings is ok an then click Ok.

rbac4

All done, notice that the Members of the selected group as well ass settings are are displayed in the right part of the window. Also notice the beautiful highlighting of Members!

rbac6

This is a very powerful yet simple tool, Instead of using PowerShell commands you get a easy-to-follow management tool. You do not have to think about the correct order of adding users or doing configuration changes. You can of course create your own Management Groups and/or edit the default groups, even if the latter is NOT recommended.


User Roles
If you want to control which setting the users should be able to change for their own account and mailbox this is the place to go. Lets say that you need to create a policy for some users and you only want them to be able to edit their contact information.

First, navigate to User Roles and then click Add to create a new Role Assignment Policy.

userroles1

Enter the name and description of your new policy and then choose the settings you want the policy to include. In this example I choose  and MyBaseOptions. MyBaseOptions is required for the users to be able to use ECP and OWA Options. When you are finished choosing roles click Save.

userroles2

Now you will see you newly created Assignment Policy listed. In the right part of the window you will se the description and a list of includes roles as well.

userroles3

Next we have to add this Role Assignment Policy to a user. Do achieve this we have to navigate to Users & Groups and then Mailboxes. Select the Mailbox you want to edit and then click Details.

userroles4

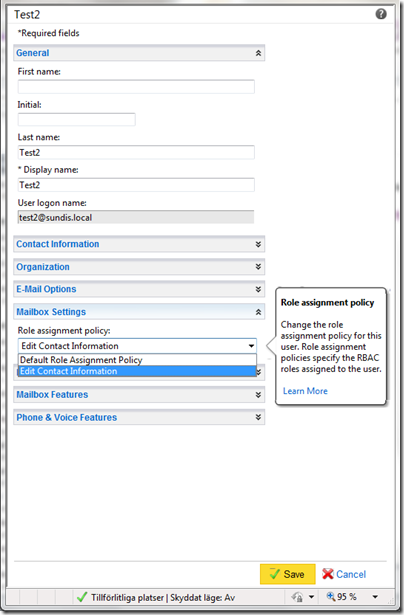
You will surely notice that there are a lot of settings that you can administrate. In this example we will not look at all of them, the one we are looking for can be found under Mailbox Settings. Choose the policy you created earlier in the Role assignment policy drop down list. In this example it is called Edit Contact Information. When finished changing settings click Save.
userroles5

That’s it, we have now created a Role Assignment Policy and enabled it for a user. 

Auditing
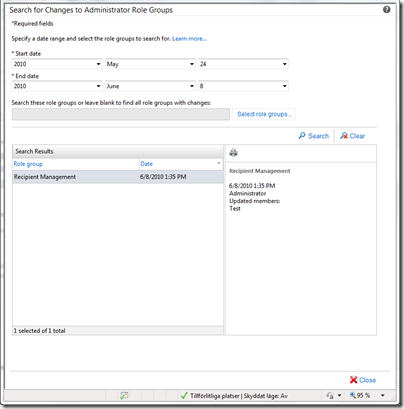
I will also give you a quick look at the auditing feature which enables administrators to generate different reports. Simply click on the report you want to view, I this example I choose Run an administrator role group report…

auditing1

As default, the report will display all role groups with changes made during the specified time range.
auditing2

The time range and role group filter can be modified as you like.To search for changes made to a specific role group click Select Role Groups and you will see a list or groups.Choose groups to search for and when finished click Ok.

auditing3

That’s all for now in this subject. If you want more information on RBAC in ECP just let me know!

Updates to Personal Archives

Microsoft, the Exchange Team, has also included changes to how the Personal Archive is working. On major changes is that now the archive mailbox can be place in a different database then the user mailbox. That is a great and very much wanted feature. For example, it enables you to store the archives on different physical disks then the user mailbox. If you are using SAS in a SAN you can store archives on cheap DAS SATA.

Create a Personal Archive in a different database
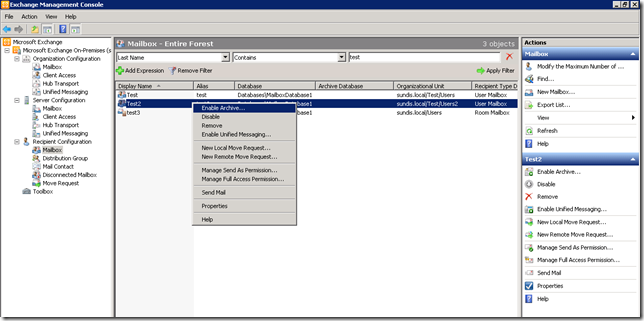
Let’s have a look at this great new feature. We start with enabling archive for our user Test2. Right click the user and select Enable Archive…
archive1

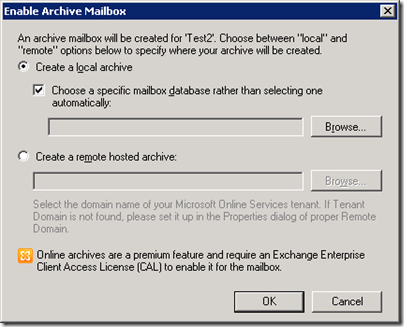
In the Enable Archive Window, check Choose a specific mailbox database rather then to select one automatically and then click Browse. Note that you can also choose to place the archive on a remote host such as Online Archives. I will not get in to that in this example…
archive2

Choose the database you want to place the archive mailbox and then click Ok.

archive3

Make sure that all settings are correct and then click Ok.

archive4

All done, notice that the Mailbox Database reads MailboxDatabase1 and the Archive Database reads MailboxDatabase2.

archive5 


Move a Personal Archive to a different database 
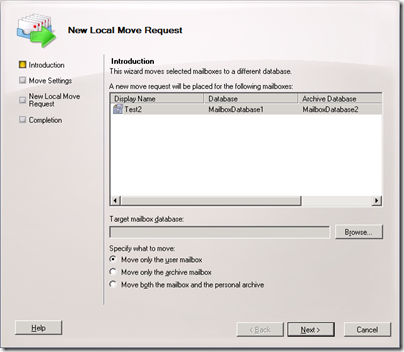
After the upgrade to SP1 you can choose to move either the User Mailbox, the Archive Mailbox or both at the same time. Let’s have a look shall we? Right click the mailbox you want to move and choose New Local Move Request.

archive7

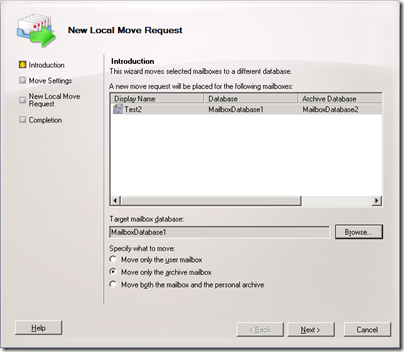
In the New Local Move Request window, click Browse to choose the target database.
archive8

In my case I will choose to move the archive mailbox to MailboxDatabase1. When you have selected the preferred database click Ok.

archive9

Before we start the move we need to specify which mailbox to move, there are three options:

  • Move only the user mailbox
  • Move only the archive mailbox
  • Move both the mailbox and the personal archive
    I choose to move only the archive mailbox. After selecting the option to use click Next.
    archive10
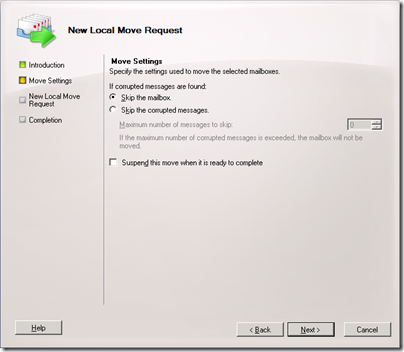
    This next window is no news to you i guess, make the changes you want to do if any, then click Next.
    archive11

Check the settings you have made in the configuration summary and then click New.

archive12

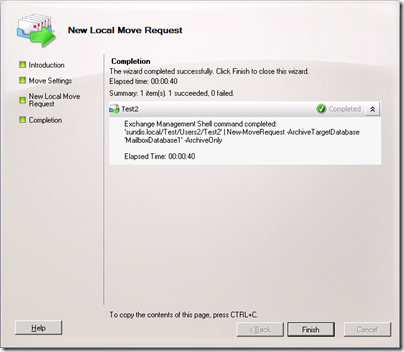
When the command finishes click Finish to close the window.
archive13

If you look at the mailbox in the results pane you will see that the Archive Database now reads the new database name. In my case that is MailboxDatabase1.

archive14

You now have the Personal Archive moved to a new location!

Provision and configure the Personal Archive in ECP
According to this early post about SP1, http://msexchangeteam.com/archive/2010/04/07/454533.aspx, you where supposed to be able to administrate Personal Archives using ECP. unfortunately it is not, as far as I can see, included in this build. I hope that it is included in a build later on and I will post it here as soon as possible.

EDIT: The MS Exchange Team confirmed toady that provisioning Personal Archives is not possible through the ECP, you will have to use EMC or PowerShell.

Thanks for reading!

This ends part one of this post,  I will post part two as soon as possible. Thanks for reading and please let me know if you have any questions or if you want me to show you a feature. Part 2 in this series can be found here: https://msundis.wordpress.com/2010/06/08/exchange-server-2010-sp1-beta-installing-and-features-part-2/

Exchange Server 2010 Service Pack 1 Beta

Good news from the Exchange Team! Exchange Server 2010 Service Pack 1 Beta is out! You can find more information here:
http://msexchangeteam.com/archive/2010/06/07/455065.aspx

And you can download the beta here:
http://www.microsoft.com/downloads/details.aspx?FamilyID=a0965fc9-2723-4947-ae6b-74bc3808e72a&displaylang=en